A guide to scaling machine learning projects using Google's tools.
the problem
As I'm working on a project with eye tracking data, here are some issues I'm facing that you may relate to:
- The dataset I want to look at is increasing in volume (e.g. sample-by-sample data vs. aggregated values),
- I want to run multiple notebook sessions without my laptop/lab machine dying or being disconnected from a tool like Google Colab,
- Model runs and debugging is taking a long time due to above points,
- I want to be able to experiment with state-of-the-art tools to allow me to delve deeper into my data (e.g. computer vision or NLP tools to allow interpretability from raw data)
If you relate to any of the above, you may find this post useful.
background reading
- Jupyter Notebooks
- Google Colab
- Google API access and authentication
- Google AI Platform notebooks
- Google Storage buckets
workflow for researchers
After working on a few of these projects, these are the areas for me that are labor intensive and where scaling specifically can help. Deliberately leaving out production or consumer interactions of models of here to focus on development and research.
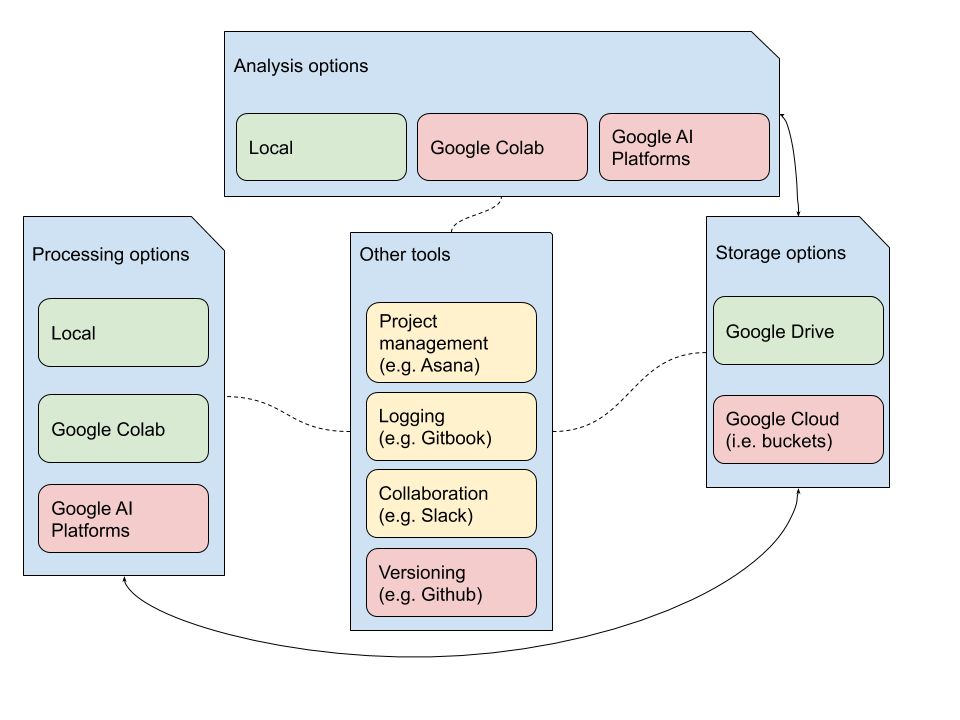
how to read the workflow diagram
- Traditional projects have four components:
- processing: where the bulk of computational time and effort is spent training models, debugging, etc.
- analysis: where the bulk of human time and effort is spent designing protocols, deriving meaning from results, etc.
- storage: the infrastructure that needs to allow quick (and cheap) access to data,
- tools: to keep everything moving and involve others.
- Most research can be done using the tools colored in green, since it involves data that is smaller, or tools that are well-defined,
- One way scaling is done is through expanding to the red blocks, where methods like multiprocessing, TPUs and aggregating industry tools in a complex way can potentially improve research,
- Data flows to and from storage and other tools interface with them to track progress and feed in new experimental ideas, indicated by arrows.
It's more complicated than this, since researchers now connect local/Colab-type systems to access cloud APIs, send and receive data from multiple storage sources, and use a whole host of other tools I probably haven't heard of. For me, generally, I think visualization summarizes the workflow.
advantages to google cloud
- Faster storage access: buckets are extremely efficient, and I found downloading a 2 GB file from a bucket in Colab took over 4 minutes, whereas my default TF 2.0 AI Platform Notebook took 5 seconds. This is because of multiple CPUs available for cheap on Cloud,
- Stability: machines more rarely bug out on Cloud, since you can often allocate a virtual machine with slightly more resources than you will use,
- Access to Cloud APIs: yes, this is available locally and through Google Colab, but the Computer Vision or NLP APIs are just easier to use and work smoother within a Google Cloud VM,
- Scaling: you can more easily allocate CPUs, GPUs, TPUs, change server sites, or have end-to-end pipelines to scale existing data down the road within Cloud,
- More responsive: this comes with better allocation of resources and the host of multiprocessing tools built into accessing, processing and analyzing data.
scaling
The rest of this post will describe specific steps and references as I transition from higher-level tools designed for more broadly-applicable data workflows (green blocks) to lower-level counterparts on Google Cloud (red blocks). Please feel free to share your thoughts via email if you have suggestions!
google bucket setup and initial data transfer
I would recommend going all in and setting up Google Storage buckets. You can access data from Google Drive from within AI Platform, Colab and even locally.
- Create a storage bucket,
- Transfer your files form Google Drive to a bucket. The provided link provides a Colab notebook with easy to use commands,
- Use rsync commands as needed to sync this folder. You can get fancy with this and have a script that periodically syncs a bucket with you Drive folder (if you're using Drive to collaborate).
NOTE: storage cost is pretty cheap, but may add up depending on how large your bucket is.
ai platform notebook setup
You only start with a default engine for testing. Most likely you'll want the TF 2.0 version though if you are doing any model training.
NOTE: this creates a compute engine within Cloud. This is the main cost hog, unless you are adding GPUs or TPUs on top of this. When you start or stop an engine, it associates available resources to your instance, depending on what you requested. That's why the storage is persistent but the computer resources are not for an AI platform notebook.
github setup for analysis notebooks
I found it helpful to only leave notebooks within Github. All data should be downloaded from Google cloud, and analysis should be able to be done from scratching using the code in notebooks. This may be annoying, but I've found it helpful to stick to it for replicability.
- Create a new repo,
- You can simply go to File -> Clone a Repo to clone a private (prompts login) or public repo. If you need more help with this, see here,
- Create your first notebook to import data.
data transfer protocol
Data will first be imported into the Compute Engine that is associated with your AI Platform Notebook.
I would recommend something like the following code block, with the following assumptions
- processing is the folder where you store files downloaded from a bucket,
- import_folder is the folder located in the bucket that will be used in the current notebook.
import os
if not os.path.exists('processing'):
    os.makedirs('processing')

try:
  import google.colab
  IN_COLAB = True
except:
  IN_COLAB = False
if IN_COLAB and not os.path.exists('processing'):
    from google.colab import auth
    auth.authenticate_user()

    !gcloud config set project {project_id}
    !gsutil -m cp -r gs:// {import_folder} processing/
elif not IN_COLAB and not os.path.exists('processing'):
    print('importing..')
    !gsutil -m cp -r gs://{import_folder} processing/
    print('done!')
else:
    print("processing folder exists. please check that this is what you want.")
This chunk will allow a different type of authentication depending on whether the notebook is run in Colab or Google Cloud. If you want to potentially collaborate with someone in Colab, publish your code for replicability or because you don't want to deal with permissions, you want the notebook to be generalizable. The IN_COLAB variable can be used to trigger analysis and processing in the same notebook, depending on where it's run.
transferring data back to a bucket
It may be the case you want to transfer data back to a bucket. I would advise against this type of workflow, and would recommend keeping only raw data within a bucket. Any data generated as a result of processing should be replicable, so regeneration through a notebook into a Compute Engine is the way to go.
However, it may be possible that you want to store a model H5 file or processed data. For this use the following gsutil command:
gsutil cp processing/upload_image.png gs://{upload_folder}
The upload_folder may be the same as your import_folder. upload_image.png is variable, and you may need to add the -r option if you want to upload a folder to your bucket.
See here for more interactions with the bucket
analysis
Now that we have some data processed in the AI platform, you may be interested in analyzing the results. You can either do this in the same notebook within the AI Platform, or on Colab.
I prefer to always have a link to Colab. The aforementioned sample Colab has code that will transfer files between buckets and local Drive locations. It's highly dependent on your use case what you will transfer, but the relevant portions you want are below.
from google.colab import drive
drive.mount('/content/drive')

from google.colab import auth
auth.authenticate_user()

project_id = 'nifty-depth-246308'
!gcloud config set project {project_id}
!gsutil ls

bucket_name = 'medium_demo_bucket_190710'

!gsutil -m cp -r gs://{bucket_name}/analysis /content/drive/My\ Drive/Data/*
In this case, we connect Google Drive to Cloud, and copy files in the analysis folder into a folder named data on our Google Drive.
The idea is that Colab is more replicable than working in Google Cloud, which is designed for faster processing and scability.
lessons learned
- Monitor billing, and ask the support team if you're confused, they're pretty responsive,
- Try out free credit first, Cloud gives $300 for free.